Practical Guide to Making and Selling Graphene Conductive Ink for Custom Electronics, Art, and Maker Projects
What Is Graphene Conductive Ink
Graphene conductive ink is a printable or paintable material that carries electricity after it dries or cures. It is usually made from a conductive carbon material, a binder, and a solvent or water-based carrier. In practice, most “graphene ink” sold to makers is a graphene-enhanced carbon ink, not pure single-layer graphene. That is fine for business purposes because customers care about performance, printability, safety, and price.
For maker and art projects, graphene conductive ink is used for:
- drawing simple circuits on paper, wood, plastic, fabric, and coated surfaces
- making touch sensors and capacitive pads
- low-voltage wearable electronics
- educational circuit kits
- conductive art prints and interactive posters
Compared with silver ink, graphene ink is much cheaper. Compared with random graphite paint, a well-made graphene ink can be smoother, more consistent, and easier to sell because it is positioned as a premium but affordable conductive medium.
A practical target is not “lab-grade conductivity.” For small business use, your goal is:
- stable shelf life
- repeatable conductivity
- easy application by brush, pen, screen, or stencil
- safe handling
- a strong story for artists, schools, and hobbyists
The Booming Market for Conductive Ink
Conductive ink demand is growing because more people want custom electronics without soldering or advanced tools. The strongest customer groups are:
- makers and hobbyists building simple circuits
- artists making interactive or metallic-looking work
- teachers running STEM activities
- indie product designers prototyping wearable electronics
- small brands making limited-run printed electronics
Why graphene ink is attractive:
- lower cost than silver ink
- less intimidating than soldering
- can be sold in small quantities at high margins
- supports “creative tech” and educational use cases
Typical market pricing:
- small 10 ml conductive ink pen: $12 to $25
- 30 ml bottle: $10 to $30 depending on performance
- educational kit with stencils and components: $25 to $60
- custom art print with conductive features: $35 to $150+
- small prototype services: $25 to $200 per job
This is a niche market, but niches can be profitable because customers value convenience and creativity more than raw material cost.
Startup Costs (under $300 breakdown)
You can start very lean. Here is a realistic under-$300 setup for making, testing, and packaging your first products:
Basic equipment
- digital scale with 0.01 g resolution: $15
- mixing cups, spatulas, stir sticks: $10
- disposable gloves, masks, filters: $15
- small electric coffee grinder or mortar and pestle for dispersion help: $20
- mini funnel set and pipettes/syringes: $15
- 2-4 oz bottles with caps: $20
- label printer or printable labels: $25
- multimeter: $20
- cheap benchtop hot plate or drying tray: $25
- sandpaper, tape, stencils, test paper, plastic sheets: $20
Materials
- graphite powder or fine graphite lubricant: $15 to $30
- graphene nanoplatelets or graphene powder: $30 to $80
- acrylic binder or water-based acrylic medium: $15 to $25
- distilled water: $2
- isopropyl alcohol: $5 to $10
- surfactant or dispersant: $10 to $20
- glycerin or propylene glycol: $5 to $10
- packaging inserts and shipping supplies: $20
Sample low-budget total:
- tools: $145
- ingredients: $90
- packaging: $25
- labels and misc.: $20
Total: about $280
You can begin even cheaper if you already own a scale, multimeter, and bottles.
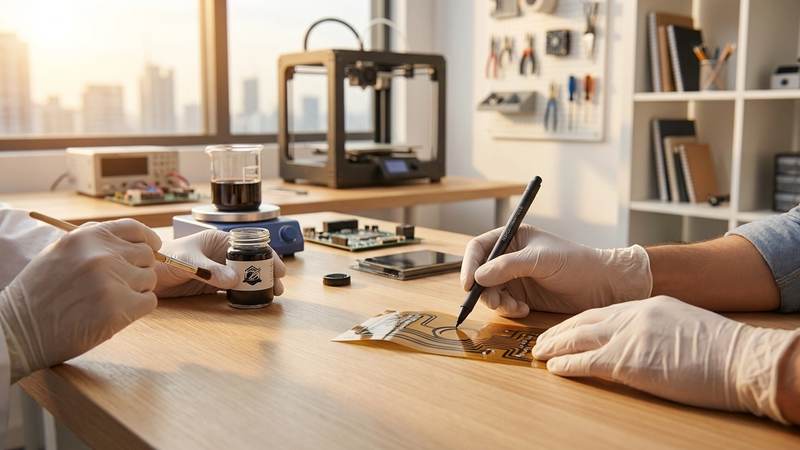
How to Make Graphene Conductive Ink at Home
Important note: there are many formulas, and performance depends heavily on particle quality and dispersion. Start with small test batches of 50 to 100 ml.
Simple water-based graphene ink recipe for brush, pen, and stencil use
Batch size: about 100 ml
Ingredients:
- 6 g graphene nanoplatelets or fine graphene powder
- 4 g graphite powder
- 20 g water-based acrylic medium
- 55 g distilled water
- 8 g isopropyl alcohol
- 2 g glycerin or propylene glycol
- 1 g nonionic surfactant or dispersant
Method:
1. Mix the water, alcohol, glycerin, and surfactant first.
2. Slowly add the graphene and graphite powders while stirring.
3. Add acrylic medium gradually.
4. Blend thoroughly for 5 to 10 minutes.
5. Let sit 30 minutes, then stir again.
6. Filter through a fine paint strainer if you need smoother flow.
7. Store in airtight bottles.
What this formula is good for:
- brush painting
- stenciling
- low-cost art prints
- educational circuits
- large-area conductive traces
What to expect:
- not as conductive as silver ink
- often good enough for LEDs, sensors, touch pads, and simple low-voltage paths
- may need multiple coats for lower resistance
Higher-performance version for better conductivity
Batch size: about 100 ml
Ingredients:
- 10 g graphene nanoplatelets
- 8 g graphite powder
- 15 g acrylic binder
- 50 g distilled water
- 10 g isopropyl alcohol
- 3 g glycerin
- 1 g dispersant
- optional: 1 to 2 g carbon black for improved percolation
This version usually prints darker and can reduce resistance, but it may be thicker and harder to brush smoothly.
How to improve performance
- Use finer powders.
- Disperse longer.
- Add a small amount of carbon black.
- Apply multiple thin coats instead of one thick coat.
- Cure fully between coats.
- Print on slightly rough paper or primed surfaces for better adhesion.
If you want pen-style ink, thin the formula with small amounts of water and alcohol until it flows through a refillable felt pen or empty marker body.
If you want screen-printable ink, reduce water slightly and increase binder until the ink has a smooth, paste-like consistency.
Testing Your Ink Quality
Testing is where you separate a hobby mix from a product.
Basic tests to run on every batch:
1. Resistance test
- Draw a 10 cm line with a consistent width.
- Let it dry fully.
- Measure resistance with a multimeter.
- Repeat on three samples.
- Track average ohms per 10 cm.
2. Adhesion test
- Apply tape to the dried line and pull it up.
- If the line lifts badly, increase binder or improve surface prep.
3. Flex test
- Draw on paper, PET, or fabric.
- Bend 20 to 50 times.
- Check for cracking or resistance increase.
4. Dry time test
- Record how long it takes to become touch-dry and fully dry.
- Customers want practical drying times under 30 minutes if possible.
5. Shelf-life test
- Leave a sealed sample for 2 to 4 weeks.
- Check for separation, settling, or clumping.
- If it settles too much, improve dispersion or add a better stabilizer.
Practical quality targets
- touch dry in 10 to 20 minutes
- fully dry in 1 to 4 hours depending on thickness
- stable after shaking
- consistent black/gray finish
- no gritty clumps
- usable on paper and coated surfaces
A very useful business metric is cost per 10 ml and coverage per bottle. If your 30 ml bottle costs you $2.50 to make and ships in a small box, you can still sell it for $12 to $18 and maintain a strong margin.
Products You Can Sell (printed circuits, art prints, educational kits)
The best early products are simple, visual, and easy to explain.
Printed circuits
Examples:
- paper LED circuits
- touch pads
- simple battery traces
- repair or prototype sheets
- wearable patches on fabric
Pricing idea:
- small custom printed circuit sheet: $15 to $40
- prototype service: $25 to $100
- custom one-off design: $50+
Art prints
Examples:
- conductive poster with hidden touch points
- interactive greeting cards
- black-on-black circuit art
- limited-edition prints with LED integration
Pricing idea:
- 8x10 interactive print: $25 to $60
- framed version: $60 to $150
- custom commission: $100 to $500
Educational kits
Examples:
- “Draw Your Own Circuit” kit
- STEM conductivity kit
- classroom pack with stencils and LEDs
- maker learning bundle
Suggested kit contents:
- 1 bottle 10 to 15 ml conductive ink
- 2 LEDs
- coin cell holder or battery pack
- paper templates
- test sheet
- instructions
- safety sheet
Pricing idea:
- single kit: $25 to $35
- classroom pack of 10: $120 to $250
- teacher bundle with lesson plan: $40 to $80
Accessory sales
- refill bottles
- empty pens
- stencils
- test cards
- replacement LEDs
- conductive tape
- starter paper packs
Accessories are valuable because they raise average order value.
Selling on Etsy, Amazon, and to Schools
Etsy
Etsy is often the easiest first channel because your product is visual and niche.
Best Etsy listings:
- conductive ink pen
- graphene art kit
- DIY circuit starter kit
- interactive art supplies
- refill bottle for maker projects
Practical Etsy advice:
- use clear photos of the ink in use
- show resistance or LED tests
- include a short demo video
- title listings with maker keywords
- keep shipping simple and lightweight
Pricing example:
- 15 ml bottle listed at $14.99 to $19.99
- cost to make and package: $3 to $5
- gross margin before fees: strong
Amazon
Amazon can work later, but it is harder because of competition, reviews, and compliance expectations.
Good Amazon products:
- educational kit
- refillable conductive marker
- bundled starter set
- classroom pack
Amazon needs:
- clean packaging
- barcodes
- better inventory control
- consistent stock
- clear safety language
Schools
Schools are excellent buyers because they purchase in bulk and value STEM materials.
How to sell to schools:
- create a one-page PDF with photos, learning goals, and price
- offer classroom packs and teacher discounts
- include age recommendations and safety notes
- make the kit easy to use in 30 to 45 minutes
- provide lesson objectives tied to conductivity, circuits, and design
Pricing strategy for schools:
- individual student kit: $8 to $15
- class set: $120 to $250
- teacher package with extras: $40 to $100
The easiest school sale is a low-risk pilot order. Offer one classroom pack at a discount in exchange for feedback and a testimonial.
Packaging and Branding Tips
Your packaging should make the product feel safe, creative, and professional.
Good branding themes:
- science + art
- clean black, silver, white design
- maker-friendly language
- “draw circuits,” “create interactive art,” “learn conductivity”
Packaging tips:
- use leak-proof bottles with induction-style or tamper-evident caps if possible
- put a warning label: “Shake well before use”
- include a “best for” list
- add a QR code to a demo video
- include storage instructions: cool, sealed, and out of direct sunlight
- keep labels simple and readable
What to include on the label:
- product name
- volume
- ingredients summary
- drying time
- surface compatibility
- batch number
- basic safety note
- your contact info or website
A premium-looking 10 to 15 ml bottle can cost you about $0.60 to $1.50 in packaging and still sell for $12 to $20.
Scaling Production
Start with small batches and standardize everything.
Step 1: Lock one formula
Do not sell five versions at once. Pick one brushable formula and one pen formula.
Step 2: Standardize your batch sheet
Track:
- ingredient weights
- mixing time
- drying time
- resistance results
- packaging date
- batch number
Step 3: Buy in larger quantities
Once you sell regularly, purchase:
- graphene and graphite in 500 g to 1 kg lots
- acrylic binder in gallon size
- bottles in case packs
- labels in bulk
Typical cost reductions:
- raw material cost can drop 20% to 40%
- packaging cost can drop 15% to 25%
- per-unit labor becomes your main cost
Step 4: Improve dispersion equipment
A small overhead stirrer, ultrasonic cleaner, or better mixer can improve consistency. Budget:
- basic mixer upgrade: $50 to $150
- ultrasonic cleaner: $60 to $120
Step 5: Outsource simple tasks
When volume grows, outsource:
- label printing
- bottle filling
- kit assembly
- shipping prep
Step 6: Build repeat customers
The best growth comes from:
- teachers reordering kits
- artists buying refills
- makers buying larger bottles
- schools buying classroom packs
Practical scaling target
If you can produce 50 bottles per month at a $10 to $15 selling price and keep your all-in cost under $4 per bottle, you have a real micro-business. At 100 bottles per month, you can begin to justify better equipment, better branding, and wholesale outreach.
Final practical advice: don’t compete only on conductivity. Compete on usability, teaching value, and creative results. The most profitable graphene ink business is usually not the one with the highest lab performance. It is the one with the easiest product, the clearest instructions, and the best fit for makers, artists, and schools.
Evaluate Our Quality
Serious about B2B integration? Test our premium Pulsed Electrical Resistive Carbon Heating turbostratic graphene in your lab. 100g sample packs available now.